Hi, folks. Below you will find Part 2 of our video series involving building a Retrosheet database. If you haven’t, make sure to check out Part 1 before digging into this.
*The video explains this, but you’ll need to re-download the files from our GitHub page. I found a couple of small errors there. No harm done, just make sure you have the updated files before continuing. The video explains how to do this.
Enjoy! Let me know in the comments or on Twitter if you have any questions or problems.
Baseball season is almost upon us. Soon, people will flood to ballparks in cities all over our great nation in search of entertainment and meaning, while baseball bloggers will continue their search for relevance and the mysterious Full Time Gig. If you fall into the latter camp (or if you just like having this kind of data handy), then it’s time to get your Retrosheet database installed/updated.
For those not in the know, Retrosheet is a magnificent project that essentially looks to turn box scores into computer records. And they’ve done a great job of it. They have all box scores from games since 1914, and play-by-play data since around 1940. What we’ll want to do is convert their records into an easily-searchable database that we can query for fun and profit.
Below is a video walking you through how to get your machine set up. We won’t actually be loading the data yet — that will come in Part 2 — but we’ll make sure your computer is prepped and has all the files and utilities is needs.
If you already installed a Retrosheet database using our instructions from last year, most of this won’t apply to you, but feel free to follow along. You’ll certainly need the links to the new packages that are now up on our GitHub page, but most of what you’ll need is in Part 2.
(Mac people: as I mentioned in the video, your instructions are coming)
I’ve worked in technology pretty much all my life, but my first job was on the support desk of a software company. It was consumer software, too, so anybody and everybody called in — professionals, novices, little kids, people who wanted to learn, people who wanted us to do their work for them, and people who didn’t understand how computer mice worked. It was challenging. But I think the hardest part was that our department didn’t have remote software. This meant that every time a person had a problem, they had to just explain it to us. We couldn’t see what was happening, so we had to trust what the person was saying was accurate. Everybody sees a computer screen differently. Very rarely did a customer see it in the same fashion I was used to seeing it.
When I published the first two parts of this Retrosheet series (Part 1 | Part 2), I did not monitor the comments well enough. I apologize for that. Some people had legitimate questions and I wasn’t there to answer them. I also learned that I was making all of you trust my explanations of things. I was making you see everything through my eyes, and some people got a little confused. This stuff happens. I’m hoping to fix that here.
I also promised a way for Mac people to have access to this, so I’m doing that as well. This article/video is for:
1. Mac (and Linux) users
2. Windows users who had trouble with the first two parts
Some caveats for Windows users looking to use this method:
1. The whole point of the first two parts was to show how the SQL files can get made using Chadwick. The idea being that you could grab the 2015 (and all subsequent season) data when that became available. The method mentioned in this article involves installing one flat file. That means that you’ll need to delete all the data and reload it for 2015 next season. I have no problem making this file for you folks, and will continue to do so as long as TechGraphs and I are around. It’s not a big deal, it’s just a different approach and I wanted to be transparent about that. Mac users basically have to do this method since the Chadwick tools aren’t available for OSX.
2. The video walks Mac users through installing and setting up a MySQL database. Your method differs, and it was explained in parts one and two linked above. I try to make it clear about when I’m dealing only with Mac users, but I wanted to give you a heads up on that.
Everyone using this method will need to download this file. Just save it to the desktop. The video will walk you through the rest.
You will also need these two lines of code. The video will tell you how to do it.
cd /usr/local/mysql/bin
./mysqladmin -u root password ‘password’
I will be monitoring the comments more closely, so let me know if you have any questions. Thanks, and good luck.
Welcome back to TechGraphs’ series on building your own Retrosheet database. If you haven’t already, go back and read part one. If you are interested in actually following along on your own system, you must do some work up front, which all mentioned in that article. If you’ve made it past that point, you’re ready to actually load some baseball data.
Before I get too far into things, I should mention that much of what I will be presenting is an updated version of Colin Wyers’ article at our sister site The Hardball Times. That article is how I first learned to do this install, so many thanks are owed to him for laying down the groundwork.
(Note: a lot of these processes will take a good deal of computing resources and time. Be prepared to wait a good deal for these to complete. I would recommend doing this during a time you won’t need to do much else on your computer.)
The first step is to download the .zip file that will contain all the batch files and folder structure you will need. There are two options; one for 32-bit machines and one for 64-bit machines. The files are essentially the same, but the file paths in the scripts vary slightly. Check back with part one if you don’t know if you have a 32- or 64-bit machine. There are instructions on finding out toward the bottom of the article.
Download the proper file and extract it into a new folder on the C:\ drive called Retrosheet, so the result looks like C:\Retrosheet. Open the folder \data\zipped, and run the file get_zip_files batch file. (Note: if you don’t know, batch files are basically strings of code that tell your computer to run multiple processes all at once, saving you a whole lot of clicking.) When you run the get_zip_files file, you’ll notice a lot of scrolling text in the Command Prompt. This is a good thing. Basically, your computer is downloading all the game files from Retrosheet and unzipping them into usable files. If you back up to the \data\unzipped folder, you’ll notice all the .EVA and .EVN files that were just downloaded. This is the format Retrosheet used for their files. We’ll be using a program called Chadwick to turn these files into MySQL data. Also in that folder are three batch files — $cevent, $cwgame, and $cwsub. Running these files will parse the data through Chadwick and place the resulting .csv files in the \data\parsed directory. Run each script one time. Be patient, these processes can take some time. You can minimize the Command Prompt window, but DO NOT CLOSE IT. Closing the window ends the process, and you’ll have to clear out the parsed directory and start over again. When the window closes, the process is done and you can run the other two processes.
Now, it’s time to get our hands a little dirty with MySQL. Open the MySQL Workbench that we installed in part one. There should only be one connection to choose from at this time.
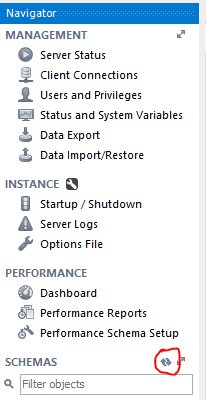
Double-click and enter the root password you created to open the workbench. The first thing we need to do is create the proper schema. A SQL schema is basically the bones of the database. It creates the tables and the fields that go into those tables. It doesn’t load the actual data, but it gets everything set up to load the data in. To create the schema, click File > Open SQL Script. Navigate out to the Retrosheet directory and open the “retrosheet table schema.sql” file. It will load the SQL commands into the workbench. In the toolbar right above all the new text, you’ll see a lightning bolt. This button runs whatever is in the editor window — in this case, our schema creation. Click the lightning bolt and let the SQL commands do their magic. When it’s all done, you’ll have to refresh your schema list to see the new Retrosheet tables. One the left-hand window, next to the word Schema, you’ll see a little refresh button. Click it, and the Retrosheet schema should now be visible.
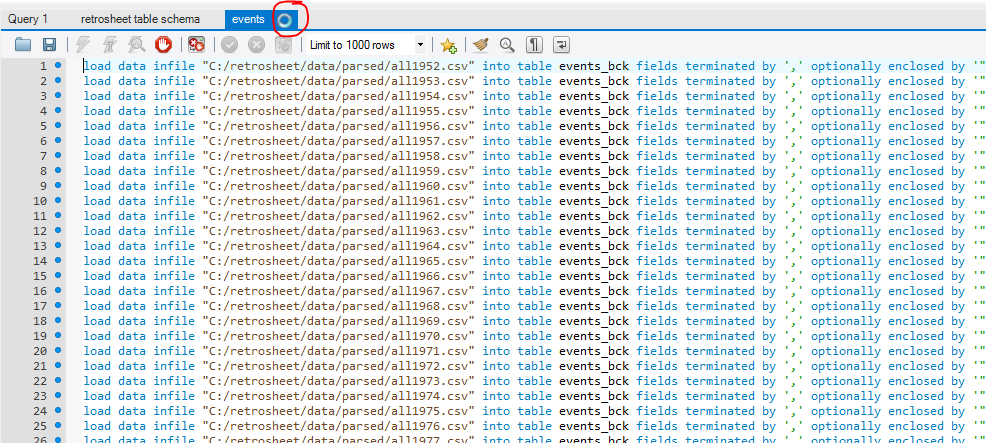
Now, it’s time to fill those schemas. Go to File > Open SQL Script again. This time, navigate to Retrosheet\loaders. These files tell MySQL to fill those tables with the data we extracted in the previous steps. Choose events.sql, and you’ll see the SQL statement load into the workbench. Click the executing lightning bolt again and wait. Then, wait some more. You’ll have to wait for a while.
See that little circle in the tab above your SQL statement? That means a process is running. Wait until that disappears before you run the games.sql and subs.sql files.
Once the other .sql files are run, you’re all done. You’ve done it, you’ve created your very own Retrosheet database.
What exactly can you do with it? Well, I think we’ll save that for the next installment. I’ll go over some basic queries and show you just what your shiney new database can do. Until then, take your time, be confident, and don’t be afraid to sound off in the comments if you have any questions.
That magical time of year has come again. Yes, the very fine folks over at Retrosheet have updated their game files once again, and the new batch includes (among other updates) the play-by-play files for every baseball game in 2014. There are a lot of things you can do with the Retrosheet files, but one of the most powerful options is to create a Retrosheet MySQL database.
Certainly, there are a lot of things you can find out at FanGraphs and Baseball Reference without the need for your own database. But every now and then, a question pops up that Googling, FanGraphs leaderboards, or even the Almighty Play Index at Baseball Reference cannot answer. It’s a luxury to have your own database, to be sure, but any baseball nerd worth their salt should at least have one to tinker with.
This tutorial is going to be starting from scratch. This means that this first installment of the series will simply be about acquiring the right tools to build out the database. We’ll get to actually inputting the baseball data in the next chapter. This may seem like the boring part, because it is. But it’s important to have the proper foundation before we get to the fun stuff.
DISCLAIMER: For right now, I’m going to be working strictly in a Windows environment. The tools that we need — which will be revealed later — were meant to work with the Windows command line. There are options for you Mac/Linux users out there, and I will discuss them down the road. But for right now, these initial steps will be for the Windows folks.
MORE DISCLAIMER: I’m trying my hardest to keep this tutorial accessible for everyone. You’ll need a basic understanding of Windows, but you shouldn’t have to be a computer wiz to follow these steps. Conversely, those that are very familiar with Windows will see this as pretty basic stuff. I’m not trying to be insulting. I’m just trying to make sure everyone can follow along.
Step 1: Installing MySQL
The term “database” might sound like you need some sort of special hardware or server rack in your house. While this is true in the corporate world, the truth is you can have your own database right on your regular PC. No need for special hardware or hosting plans or anything of the sort. This is not to say that having a hosted database doesn’t have it’s advantages, but for the time being, we’ll be dealing with what are called local databases — those that live right on your regular machine.
However, a complete Retrosheet database will require a good deal of hard drive space. From my experience, a Retrosheet database that spans all the available data requires a little over 8 GB of hard drive space. However, as Retrosheet releases more and more updates, that need will expand. To be safe, I wouldn’t work with any less than 15 GB of available space. You’ll be surprised how fast that fills up.
Personally, I have a separate machine that hosts my personal database. It’s a headless (just a tower stowed away in my attic, no monitor or keyboard attached) unit that performs a lot of functions like storing my ripped DVDs and music. But my Retrosheet info also lives there, and I connect to it to do my querying. If you are totally baffled by this notion, don’t worry. I’m still teaching you how to install it locally. But for those with a little knowledge of how to handle some basic home networking, know that this is an option.
OK. Let’s get to the action. The type of database that we’ll be using is called MySQL. It’s a very common database language. There are lots of resources in both book and online form to learn more about it, and pretty much any problem is easily Googlable. It’s one of the industry standards, so that’s what we’ll deal with.
To keep things nice and free, and since we’ll be only using this for personal reasons, we’ll deal with the Community Edition of MySQL. You can find the download link here. You’ll want to choose the second (larger) download link toward the middle of the page. The next page will give you some buttons to login or signup, but you can bypass that with the “No thanks…” link a little further down the page. Once the .msi file has downloaded, go ahead and run it.
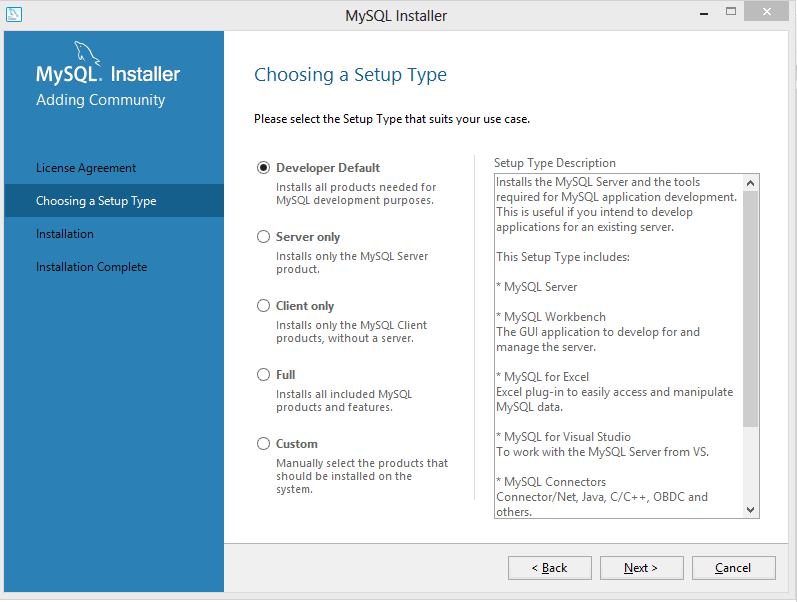
If you want to go the quick and dirty way, go ahead and choose the Developer Default option. It will install everything you need, and probably some stuff you don’t. You might want that stuff later on, but for the sake of this article, I’m going to choose the Custom option and pick what I want installed. You should install the Server and Workbench at minimum, though it’s a good idea to include the notifier and the documentation as well. You’ll have to click through some category trees to get what you want. Use the green arrow to add your options to the list of things to be installed.
The installer will check to make sure you have all the required utilities to do what you want. In my case, I didn’t have the C++ 2013 distribution on my machine — you may have more things that need installing. Just click Execute and the necessary files will be downloaded and the respective installers will run. Once everything is installed, click Next and your MySQL install will begin.
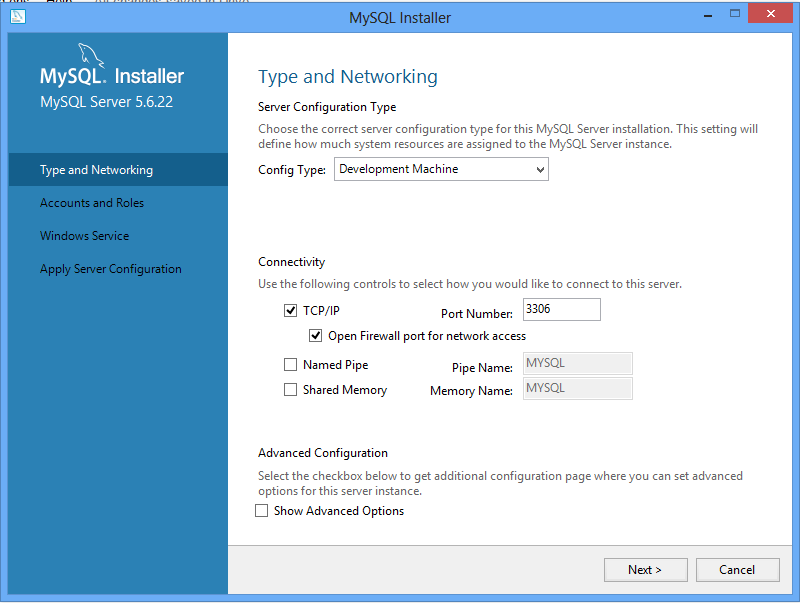
For configuration purposes, go ahead and keep the defaults, unless you have specific reasons not to (and you know what you’re doing).
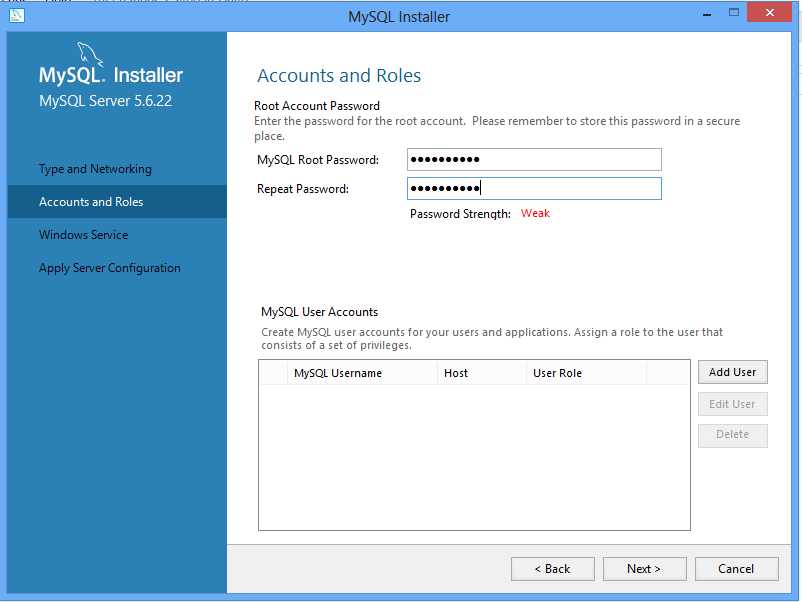
You can add users to the database if you want, but for simplicity, we’re just going to define a password for the “root” user. REMEMBER THIS PASSWORD. It’s your key to doing anything with the database — adding data, querying, etc. If you lose it, you’re pretty much horked. Use a familiar password or write it down. If you’re just having this on your own machine, there’s really no need for a super-complicated password. It’s holding freely-available data, after all.
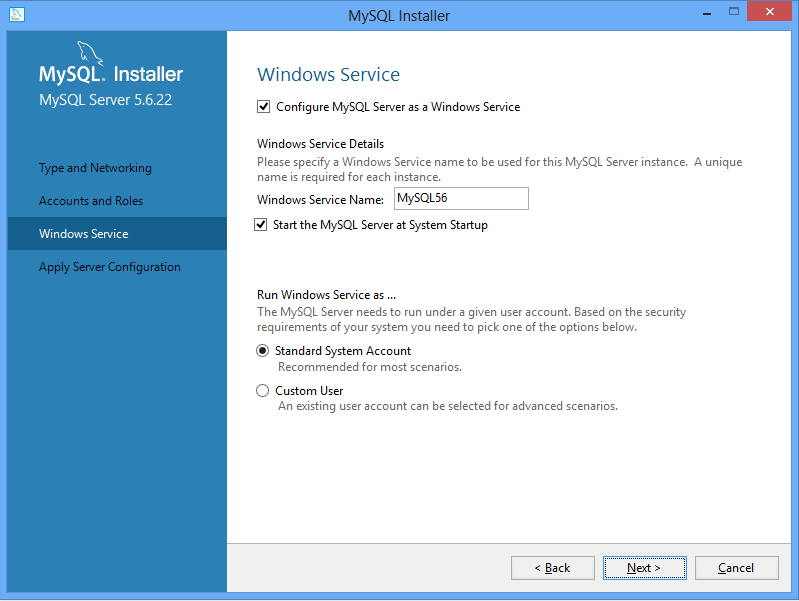
For the Windows Service configuration, you can keep the defaults as well. You can choose to not have the MySQL service to run when you start the machine, but if you do you’ll have to manually start the service each time you want to use the database. If you don’t know what that means, have it run on default.
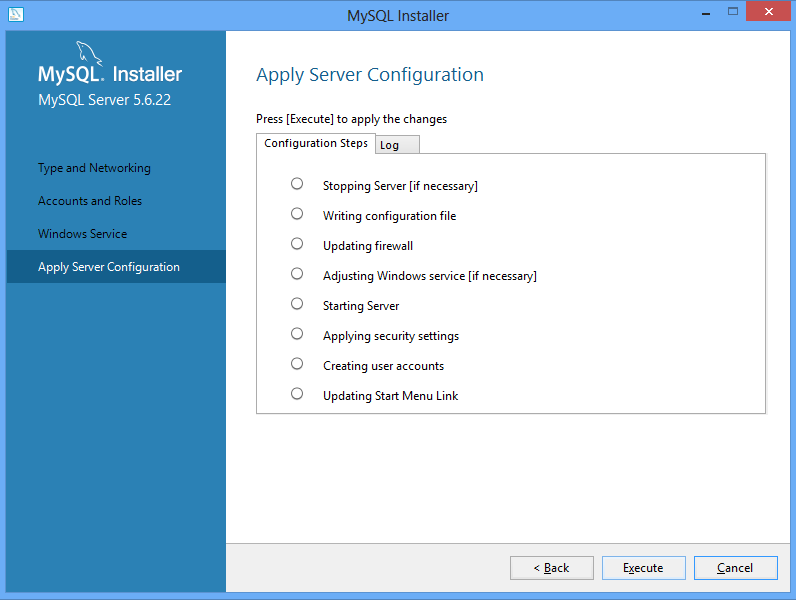
Go ahead and click Execute, and the options will be configured. After that, a few clicks of Next should do it. You’ve just installed MySQL on your machine. Congratulations!
Step 2: Install Wget
Wget is a great utility for downloading mass amounts of data from a server without having to click a thousand links. It’s a script-based tool, and it’s what you’ll need to download all the Retrosheet data with in one big swoop. Don’t worry, we’ll provide the scripts you’ll need.
Download the installer here. Run the installer, keeping all the defaults.
Step 3: Install 7-Zip
7-Zip is a .zip file utility. It’s one of the best free tools for handling .zip files, and it’s what we’ll be using. You can download the installers here. Choose one of the first two options, taking care to choose the right version in regards to 32- or 64-bit. If you don’t know what version you have, go to the Control Panel of your machine, click System and Security, then System. You’ll get a similar screen, which should show you your version. Remember which one you have, as this will be important later on.
Yes, I name all of my devices after baseball players. Don’t judge.
After you’ve downloaded the right version, go ahead and install, using all the defaults.
You’ve done it! You’ve done all the pre-steps for installing your Retrosheet database. If you have any questions, sound off in the comments. Stay tuned, as next week, we’ll get our hands dirty with installing the actual Retrosheet data. I’ve made it as painless as possible, I promise. Don’t get worried. If you can handle what we did today, you can handle the rest. Good luck, and don’t feel bad about asking for help.