Welcome back to TechGraphs’ series on building your own Retrosheet database. If you haven’t already, go back and read part one. If you are interested in actually following along on your own system, you must do some work up front, which all mentioned in that article. If you’ve made it past that point, you’re ready to actually load some baseball data.
Before I get too far into things, I should mention that much of what I will be presenting is an updated version of Colin Wyers’ article at our sister site The Hardball Times. That article is how I first learned to do this install, so many thanks are owed to him for laying down the groundwork.
(Note: a lot of these processes will take a good deal of computing resources and time. Be prepared to wait a good deal for these to complete. I would recommend doing this during a time you won’t need to do much else on your computer.)
The first step is to download the .zip file that will contain all the batch files and folder structure you will need. There are two options; one for 32-bit machines and one for 64-bit machines. The files are essentially the same, but the file paths in the scripts vary slightly. Check back with part one if you don’t know if you have a 32- or 64-bit machine. There are instructions on finding out toward the bottom of the article.
Download the proper file and extract it into a new folder on the C:\ drive called Retrosheet, so the result looks like C:\Retrosheet. Open the folder \data\zipped, and run the file get_zip_files batch file. (Note: if you don’t know, batch files are basically strings of code that tell your computer to run multiple processes all at once, saving you a whole lot of clicking.) When you run the get_zip_files file, you’ll notice a lot of scrolling text in the Command Prompt. This is a good thing. Basically, your computer is downloading all the game files from Retrosheet and unzipping them into usable files. If you back up to the \data\unzipped folder, you’ll notice all the .EVA and .EVN files that were just downloaded. This is the format Retrosheet used for their files. We’ll be using a program called Chadwick to turn these files into MySQL data. Also in that folder are three batch files — $cevent, $cwgame, and $cwsub. Running these files will parse the data through Chadwick and place the resulting .csv files in the \data\parsed directory. Run each script one time. Be patient, these processes can take some time. You can minimize the Command Prompt window, but DO NOT CLOSE IT. Closing the window ends the process, and you’ll have to clear out the parsed directory and start over again. When the window closes, the process is done and you can run the other two processes.
Now, it’s time to get our hands a little dirty with MySQL. Open the MySQL Workbench that we installed in part one. There should only be one connection to choose from at this time.

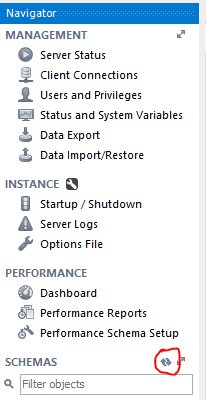
Double-click and enter the root password you created to open the workbench. The first thing we need to do is create the proper schema. A SQL schema is basically the bones of the database. It creates the tables and the fields that go into those tables. It doesn’t load the actual data, but it gets everything set up to load the data in. To create the schema, click File > Open SQL Script. Navigate out to the Retrosheet directory and open the “retrosheet table schema.sql” file. It will load the SQL commands into the workbench. In the toolbar right above all the new text, you’ll see a lightning bolt. This button runs whatever is in the editor window — in this case, our schema creation. Click the lightning bolt and let the SQL commands do their magic. When it’s all done, you’ll have to refresh your schema list to see the new Retrosheet tables. One the left-hand window, next to the word Schema, you’ll see a little refresh button. Click it, and the Retrosheet schema should now be visible.
Now, it’s time to fill those schemas. Go to File > Open SQL Script again. This time, navigate to Retrosheet\loaders. These files tell MySQL to fill those tables with the data we extracted in the previous steps. Choose events.sql, and you’ll see the SQL statement load into the workbench. Click the executing lightning bolt again and wait. Then, wait some more. You’ll have to wait for a while.
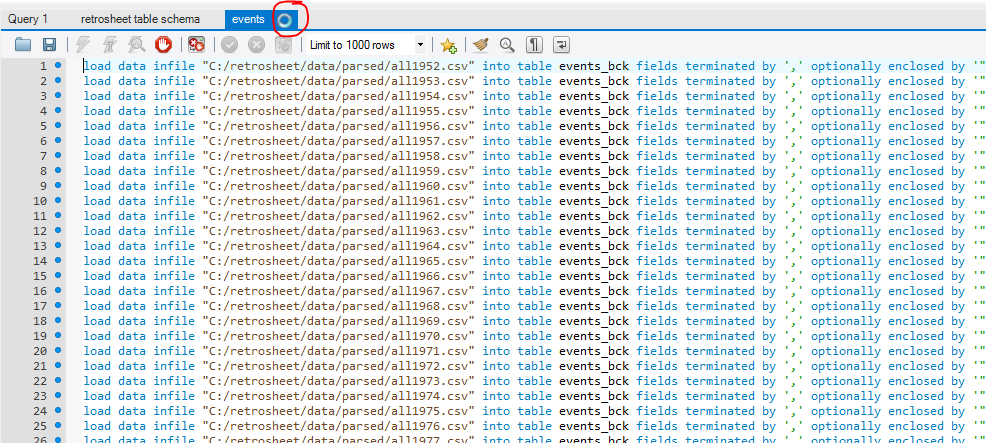
See that little circle in the tab above your SQL statement? That means a process is running. Wait until that disappears before you run the games.sql and subs.sql files.
Once the other .sql files are run, you’re all done. You’ve done it, you’ve created your very own Retrosheet database.
What exactly can you do with it? Well, I think we’ll save that for the next installment. I’ll go over some basic queries and show you just what your shiney new database can do. Until then, take your time, be confident, and don’t be afraid to sound off in the comments if you have any questions.


